Garage Door Troubleshooting Guides
6th Sep 2023
Our customers encountered several common garage door opener issues concerning operations and programming. These garage door troubleshooting tips provide solutions to a variety of topics concerning doors and opener remotes. Select a subject below to see detailed responses and instructions from our experts. If you are still having garage door opener problems or don't see your issue listed here, contact us to speak directly with a support team member.
My garage door will not go down using my transmitters. I can only get the door down by holding the wall button down.
This is typically because the infrared sensors are malfunctioning. If this is the case, one of the sensor lights will usually be blinking. The problem can be due to a blocked path between the sensors, dirty eyes, loose wires at the sensors, loose wires at the motor head or just bad sensors. With malfunctioning garage door sensors, the transmitters (remotes) will not work to close the garage door. You will find the door only move an inch or so in the "close" direction and then reverses. When this happens, your garage door will only close by holding down the wall button, or wall console, until the door fully closes. This method is the only way to override the safety and close the door.
To try and correct the problem, make sure the eyes on the sensors are clean, the wire connections are securely fastened at the sensors and motor head and the eyes are directed at each other. Also, try unplugging the garage door opener and re-plugging the unit back into the outlet. This acts as a reset and may reset the sensors. If none of these things work, you may have to replace the sensors. You can find new sensors on our website by visiting the Infra-Red Sensors section or entering "infrared sensors" in the Search bar.
The garage door closes to the floor, hesitates and reverses back up to the open position. What is wrong?
You have an "open" limit and a "close" limit on your garage door opener. These limits set the distance the door will open or close before stopping. In the down direction, if the limit is set beyond the point at which the door closes fully, the door will hit the floor and act as if it is hitting an object. The safety feature then tells it to reverse.
If you have a screw drive or chain glide unit, you need to set the limit closer to the motor so the opener shuts off earlier (when the door closes). If you have a chain drive with limit lugs attached to the chain - one for the up limit and one for the down limit - you need to experiment with the placement of the down limit lug on the chain so the opener will shut off at the point the door closes. If your chain drive has "driven limits," the limits are individually labeled and adjustable using a screwdriver. The driven limits are located on the back or side of the motor head. You can find garage door limits on our website in the Limit Switches section or go to the manufacturer section to search for specific limits.
How do I program my in-car transmitter to a Genie Intellicode® or Chamberlain Security Plus® system?
To program a built-in car transmitter to a rolling code garage door opener (Genie rolling code is called Intellicode®, LiftMaster/Chamberlain/Sears is called Security Plus®), you should take the following steps.
Clear out anything previously programmed into the in-car system from the factory by holding down the two outside buttons simultaneously until the in-car red light starts flashing rapidly. This may take up to one minute. (In a few cases, some make cars require the keys to be in the ignition, or the car motor must be running, or the car door must be shut.)
Decide which button you want to link to your in-car garage door transmitter. Hold your transmitter up near the selected button, pressing both the garage door remote and the selected in-car transmitter button simultaneously. Hold the buttons down until the in-car red light flashes rapidly. This sets the in-car transmitter as your garage door opener's main transmitter. You are not done, though - you now need to make this in-car transmitter your personal transmitter.
Go to the Learn button on your garage door opener. The button is usually right next to the area where the floppy antenna is connected to the motor head. With Genie, it is most often behind the light lens and flashes red when pressed. With Sears or LiftMaster (Chamberlain), it is near or part of the terminal screw board. It is usually square-shaped, sometimes round, and always colored red, amber or purple. Press this Learn button momentarily. A red light should start to flash or an amber light should turn on and stay lit. Go back to the in-car transmitter button you programmed and press this button three or four times, or until the door starts moving. This should set your in-car transmitter to your garage door opener.
How do I program my Intellicode or Security Plus transmitter?
The code changes every single time you press the button. It is a rolling code transmitter and there are 4.5 billion combinations, so it is never on the same frequency twice! If you've lost a transmitter, you can delete all the transmitters programmed into your garage door opener by holding down the Learn button, or Smart button, until the light stops blinking. The Learn or Smart button is behind the light lens or on the back of the motor head and is close to the floppy antenna wire. Some models require you to unscrew two bolts on the light lens to be able to remove the lens and access the Learn button. On the newer model Genie openers there are a set of buttons located at the bottom, outside cover of the motor head: one square and two triangle buttons (shown in question nine). The smart button for Chamberlain openers is usually on the terminal board.
To reprogram each transmitter, push the Learn button momentarily and the red or amber light will start blinking. It will blink for up to 30 seconds. In that time, press one of your transmitters three or four times until the garage door starts moving. For Chamberlain/LiftMaster/Craftsman openers, the Learn button is colored. After momentarily pressing this button, press the remote and hold for five seconds. Keep the transmitter at least three feet away from the antenna. Perform the same process with each transmitter.
For the newer Genie openers with the access buttons on the outside bottom cover, press and hold the square button until a blue light comes on next to the button and release. It will change to purple and start blinking. Stand back four feet and press the remote slowly three or four times. (If you need to erase all remotes, in-car controls and keypads, hold the square button until the LED turns blue and let go. When it switches to purple and blinks, press and hold the two triangular buttons down at the same time until the lights turn blue and let go. This should clear all remote systems to this opener.)
If you need an Intellicode transmitter (GIT-1), you can find them on our website in the Genie section. If you need a Chamberlain (LiftMaster/Sears) Security Plus transmitter, go to the Garage Door Transmitter section of our Chamberlain store. Stanley and Linear have similar rolling code transmitters. To access our transmitters, go to the Transmitters and Receivers section and click on the appropriate manufacturer.
My garage door is opening and closing by itself as if someone else has the same frequency.
In most cases, when a garage door opens or closes by itself, or when you find your door open, upon returning home, the problem is due to a short somewhere. This short is most likely in one of three places: in one of your transmitters, in the wall button or the wall button's wiring.
When there is a short in your garage door transmitter, you will often find the garage door is up upon returning home, even though you know you closed the door when you left the house. A short in your transmitter causes a continuous signal to be sent. As you are pulling out of the driveway, the garage door closes fully and appears to stop - but as the carriage and arm run past the down limit and hit the header bracket, it reverses and the door begins to open just as you start driving off down the road. You come home to find the garage door is up as if someone else had opened your door.
The best thing to do to troubleshoot the garage door opening problem is to remove the batteries from your transmitters and try operating the door using the wall button. If the problem is intermittent, you may want to do this for a day or two to eliminate the transmitters as the culprit.
If the problem persists, try removing the wall button wire at the motor head to ensure it is not a short in the wire to the button, then try operating the garage door with the transmitters only. If this stops the problem, replace the wires and test the wall button. It is a process of elimination to determine the cause.
Disconnecting Genie garage door opener carriages to manually operate the door.
Genie Screw Drive Carriage:
To disconnect the door opener carriage and operate the garage door manually, pull down on the red cord and knob of the traveler carriage to release the door from the Genie locking system. Operation of the door can now be performed by manually lifting and closing the door. To reconnect the carriage, pull the emergency release cord and knob toward the motor. Try to keep the cord as parallel to the rail of the garage door opener as possible. You may need to give the cord a slight yank to reconnect. You should now be able to operate the door using the Genie garage door opener. The first image shows the genie screw drive carriage connected and the second image shows the position of the carriage when it is disconnected.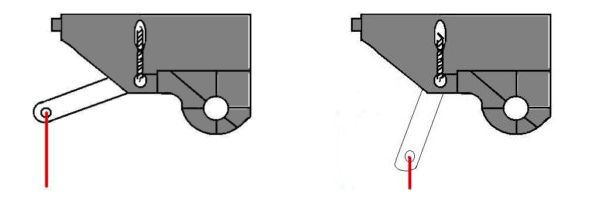
Genie Chain Glide Carriage:
To disconnect the carriage and operate the garage door manually, pull down on the red cord and knob of the traveler carriage to release the door from the Genie locking system. Operation of the door can now be performed by manually lifting and closing the door. To reconnect the carriage, pull the emergency release cord and knob toward the motor. Then manually lift or close the door until the carriage locks into place. You should now be able to operate the door using your Genie garage door opener. The first image shows the genie chain glide carriage position connected and the second image shows the position of the carriage when disconnected.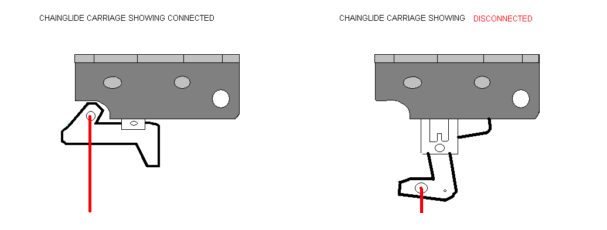
Genie Chain Drive Carriage:
To disconnect the carriage and operate the garage door manually, pull down and toward the motor or door on the red cord and knob of the traveler carriage to release the door from the Genie locking system. By pulling down and at the same time directing the cord forward toward the door opening or back toward the motor, you are locking the release bar down to disconnect the carriage. Operation of the door can now be performed by manually lifting and closing the door. To reconnect the carriage, pull the emergency release cord and knob straight down and release. Notice in the first image below, the slotted gap in the bar that the red cord is attached to disappears. This means it is in the engaged position. Then manually lift or close the door until the carriage locks into place. You should now be able to operate the door using your Genie garage door opener. The first image shows the Genie chain drive carriage position connected to the garage door. The slotted gap in the release bar is not visible. The second image shows the Genie chain drive carriage in the disconnected position. The slotted or notched gap is visible.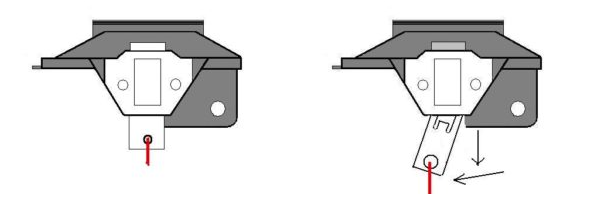
Where is the Genie, LiftMaster or Sears Craftsman Learn button for programming my Intellicode or Security Plus remotes?
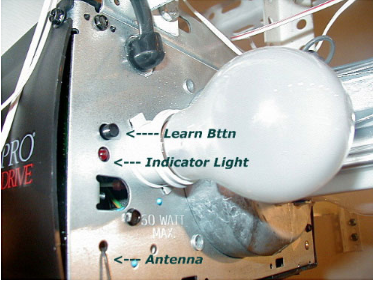
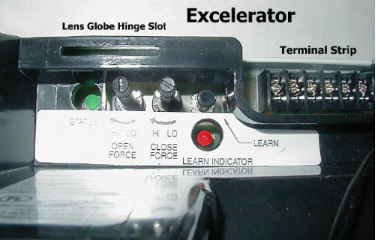
In most cases, the Genie Learn button is located beneath the light lens cover near the floppy antenna wire. Open the light lens globe to expose the Learn button as shown below.
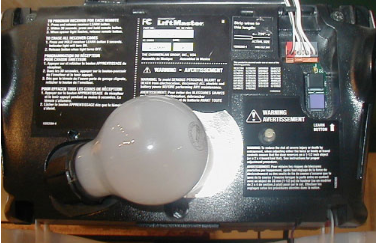
The lower photo shows the Genie Excelerator motor head. The lens globe is not connected in this photo and the antenna wire is not visible, but the Learn button is marked and accompanied by an arrow pointing to the button. The third photo is a LiftMaster with a purple square Learn button for programming LiftMaster remotes to the motor head receiver. With either LiftMaster or Sears Craftsman remotes, the Learn button is always square and colored red, green or purple. It is always located beneath the wire connecting to the terminal strip.


How do I set the limits on a Genie chain drive (open chain) garage door opener?
Please see our detailed guide on Setting Genie Chain Drive Limits .
How to set limits on the new line of Genie garage door openers?
See the instructions below for setting limits on the new line of Genie garage door openers. A partial listing of these openers include the TriloG, IntelliG, ReliaG, GPower, PowerMax, ChainMax and PowerLift openers.
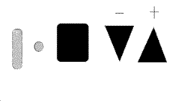
- On the bottom outside motor cover of your Genie motor head is a set of programmable buttons and LED lights. These consist of a square button and two triangular buttons, which represent the down-limit adjustment (-) and the up-limit adjustment (+), along with two LED lights - long and short (shown on the image below in grey). While the door is in the up position, press and hold the triangular arrow button pointing down (-) until the long LED light turns blue.
- Release the down arrow button. The LED should begin flashing.
- While the long LED is flashing blue, press and hold the Down arrow button until the door reaches the floor and let go. If needed, you can fine-tune the "closed" point by pressing the Up or Down arrow keys.
- Press the square button to set the down limit into memory. Both Long and short LED's will flash and turn off.
- Now press and hold the Up arrow button (+) until the short LED turns blue.
- Release the Up arrow button to cause the LED to begin flashing.
- While the short LED is flashing blue, press and hold the Up arrow button until the door reaches full opening and let go. Again, if needed, you can fine-tune the opening point by alternating the Up or Down arrow keys.
- Press the square button to set the Up limit into memory. Both LEDs will flash and turn off.

