Genie Aladdin Connect Installation & Troubleshooting
Posted by Charlene Pepiot on 14th Nov 2023
The Genie Company's Aladdin Connect has proven to be one of the best Smart Home apps on the market. Whether you need assistance with installation, setting it up for Amazon Alexa, Google Home & Assistant or just need help troubleshooting, North Shore has you covered! We’ve been in the industry for decades, and our staff have worked with Genie’s products firsthand so we know what we're talking about.
What is Aladdin Connect?
Genie’s Aladdin Connect is a leading Smart Home app that allows homeowners to use their smart device from anywhere in the world to monitor and control their garage. Aladdin notifies you when your door is opened or closed and you can add up to 20 family or guest users. By partnering with other home automation companies, Genie provides maximum convenience to the homeowner to connect their garage with other apps and products in their chosen Smart Home platform.
Is Genie a Good Brand?
Genie is one of the industry’s most trusted garage door part manufacturers. The company is an industry leader in innovative technology, from creating the first mass-produced, radio-controlled residential garage door opener in the 50s, to the smart home technology it continues to improve upon today. Those looking for a new Genie opener or are curious about how their Genie opener ranks with other models can check out our handy Genie Garage Door Openers Comparison Guide Chart!
What Is Aladdin Connects Requirements?
Before purchasing a device with Aladdin Connect compatibility, be sure your home is able to function with the software. The Aladdin Connect app is compatible with any Genie Wi-Fi-enabled garage door opener or retrofit kit.
- A Wi-Fi router is required with:
- 802.11/b/g/n
- 2.4GHz with WPA2
- Or WPA Security
- A strong Wi-Fi signal is needed in the garage to pair with the operator and cloud. It must be at least two bars (-65dbm) otherwise a Wi-Fi extender may be needed from an electronics store.
- Aladdin is not for use with one-piece doors or operators without photo eyes.
- Aladdin Connect external device compatibility:
- Compatible with Genie Series II operators. You can identify these Genie garage door openers by having white wall control buttons.
- Not compatible with Genie Series III operators (Identified by black wall control buttons).
- Smartphone and/or tablet versions are compatible with Android 7.0 and higher as well as Apple iOS 12.1 and higher.
Aladdin Connect Installation Instructions for General Setup, Amazon Alexa, Google Home & Google Assistant
What Tools Do I Need for Installation?
Prior to installation, make sure you have the following at your disposal:
- Drill & 3/32 Bit Small Common Screwdriver
- 5/16 Wrench or Nut Driver
- Phillips Head Screwdriver
- Wire Cutters/ Strippers
- Hammer
Aladdin Connect Quick Set up Guide Installation Instructions
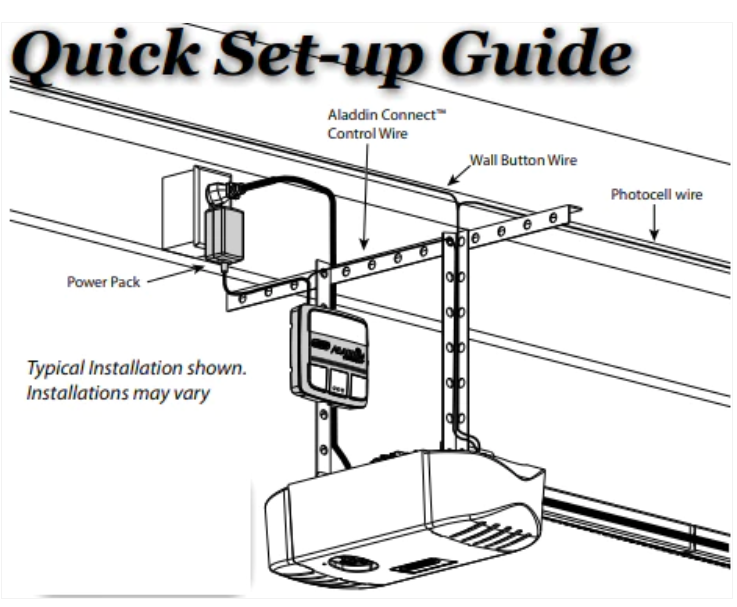
STEP 1 Determining Mounting Location
- Before starting, ensure the door control module is installed where it can be seen and heard when someone is standing under the garage door while open.
- Determine the Mounting Location.Note that the location must be within 5ft of a standard 110-volt AC power outlet. There are 3 ways to mount the Door Control Module (DCM):
- Mount next to the opener near the ceiling.
- Mount next to an existing wall console.
- Mount in place of an existing wall console.
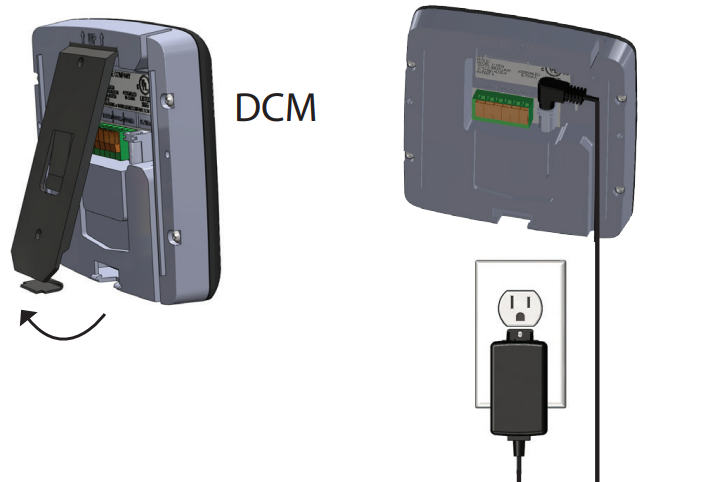
- Once the mounting location has been chosen, remove the mounting bracket from the back of the DCM, plug the power cord into the power outlet, and connect the plug to the DCM.
STEP 2 Checking Wi-Fi Coverage

- Before beginning, please verify the Wi-Fi signal in the garage.
- Connect a smartphone to the home Wi-Fi and walk into the garage.
- Place the phone where the DCM will be mounted.
- The Wi-Fi signal strength at that location must be at least two bars.
If there are not at least two bars, try these steps to improve signal strength:
- Make sure that the Wi-Fi router is out in the open (not behind large electronics or in a cabinet).
- Move the Wi-Fi router closer to the garage.
- Purchase a Wi-Fi extender, available at most electronics stores.
STEP 3 Download the App
|
|
- Scan the QR code above or visit the app store to start the setup of the Aladdin Connect device.
- Follow the instructions in the app to create an account and set up the device and Wi-Fi.
STEP 4 Wiring the Aladdin Connect (Single door install shown)
|
|
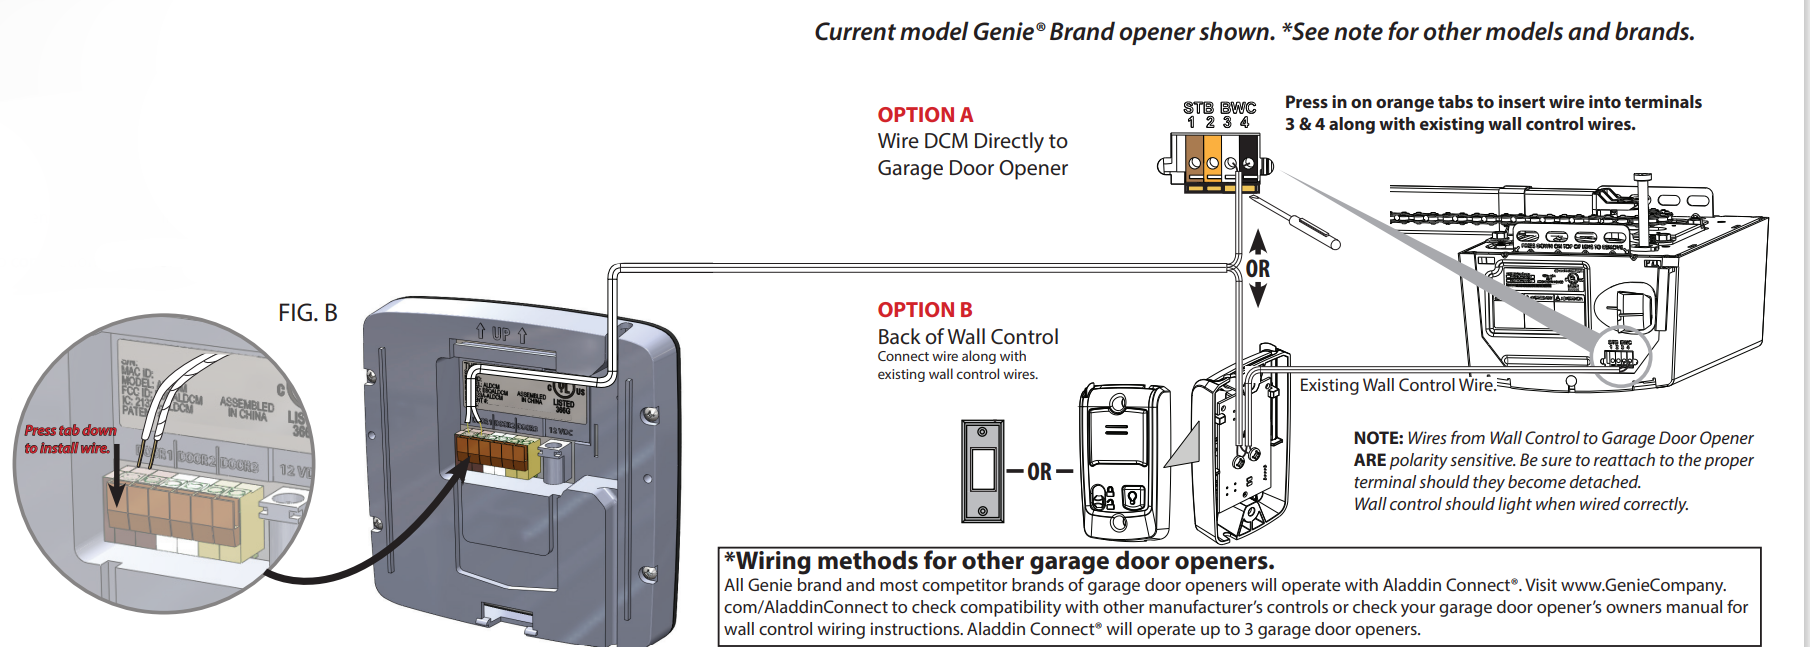
Aladdin Connect will wire directly to the wall control connections at the powerhead or directly to the wall control. New Genie models are shown in the examples.
- Make sure the garage door opener is unplugged.
- Leave the wire spool intact for this part of the installation.
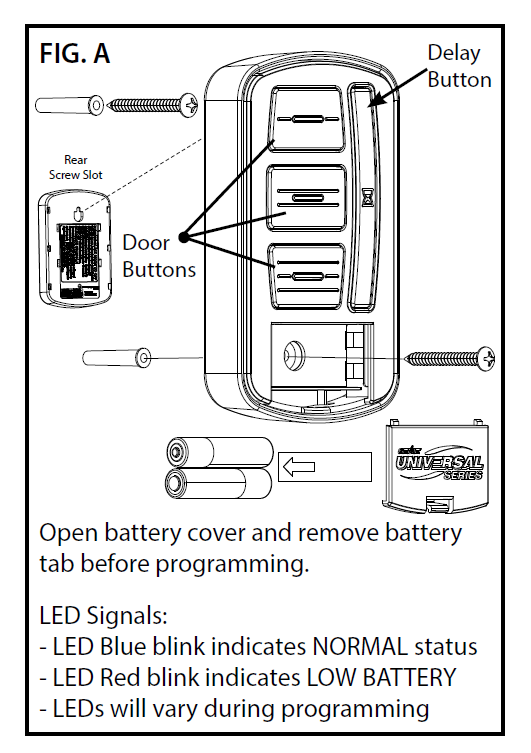
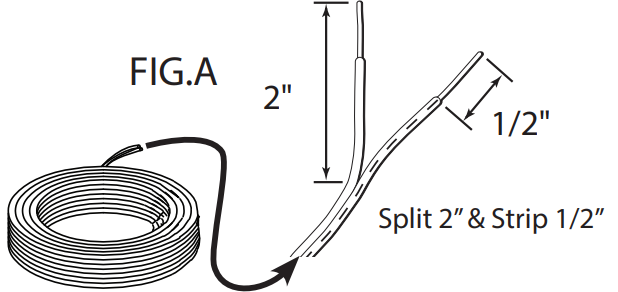
- Split the provided dual strand wire approximately 2 inches then strip half an inch of insulation (FIG A).
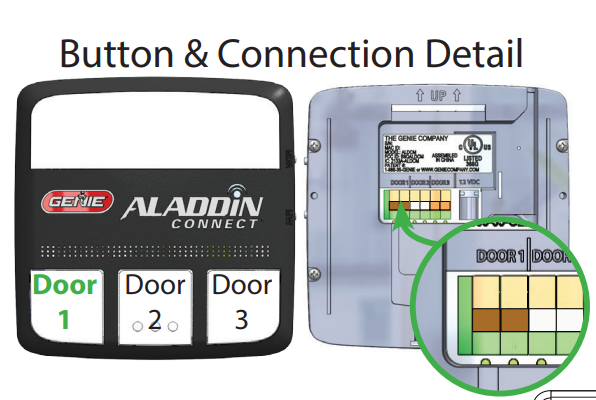
- Press the orange tabs down and insert both wires into connection points for DOOR 1 on the back of the DCM (FIG B).
- Trim and split the other end of the dual strand wire approximately 2 inches and then strip half an inch of insulation.
- Insert wire into wall control inputs either:
- (OPTION A) Directly to the garage door opener.
- OR
- (OPTION B) To the Back of the wall control.
STEP 5 Mount and Power Aladdin Connect
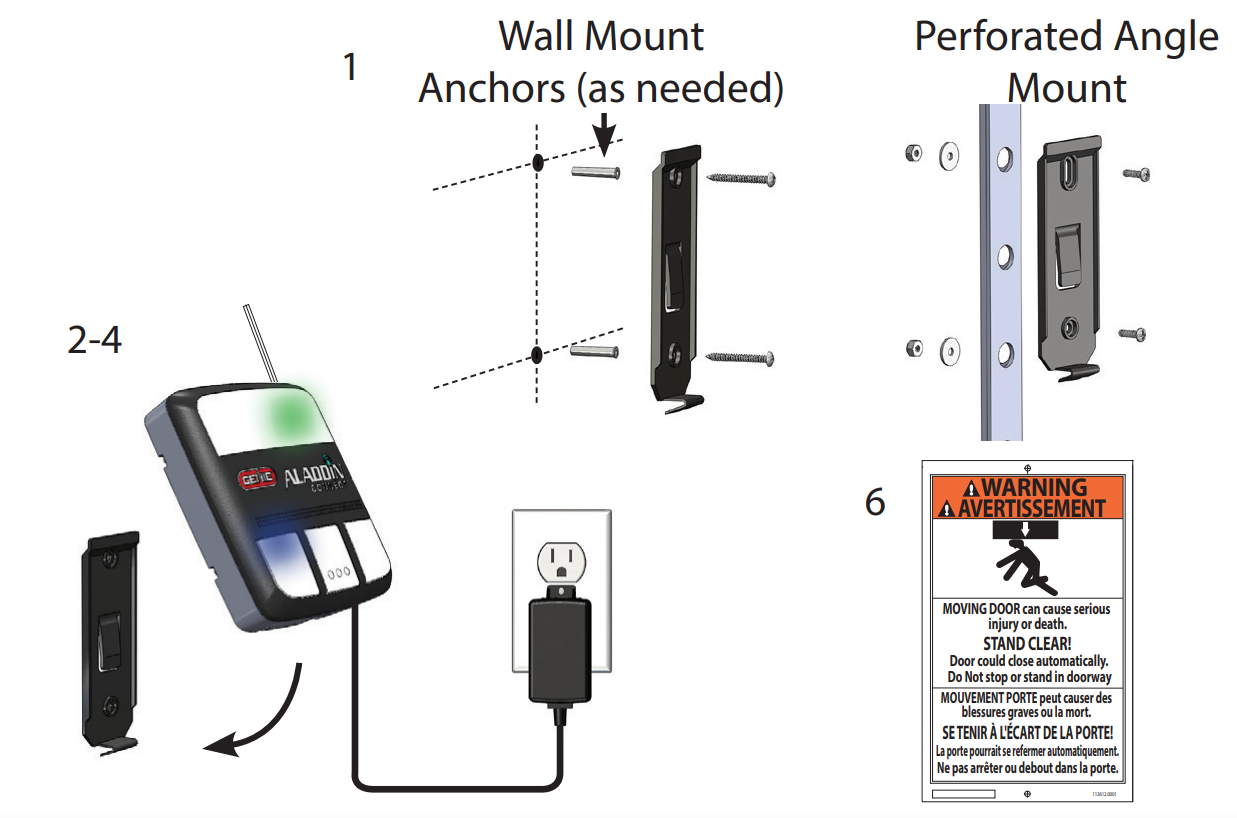
- Using the DCM mounting bracket as a template at the optimal Wi-Fi location, mark and drill 2-3/32” pilot holes and mount the bracket to the wall using the supplied screws. If you are mounting to drywall, use anchors provided in the kit. If mounting to a perforated angle at the opener’s location, use nuts, washers and screws provided.
- Plug the Power Pack into the wall outlet. An extended screw is provided to secure the Power Pack to the outlet if it is needed.
- Plug the Power Pack into the back of the DCM as shown in STEP 1.
- NOTE: The LEDs on DCM will flash momentarily as it reacquires signals.
- Snap the DCM onto the mounting bracket.
- Route the wires and secure them with supplied staples.
- Affix the warning placard next to the wall control or DCM in plain sight to signify that the door will operate remotely.
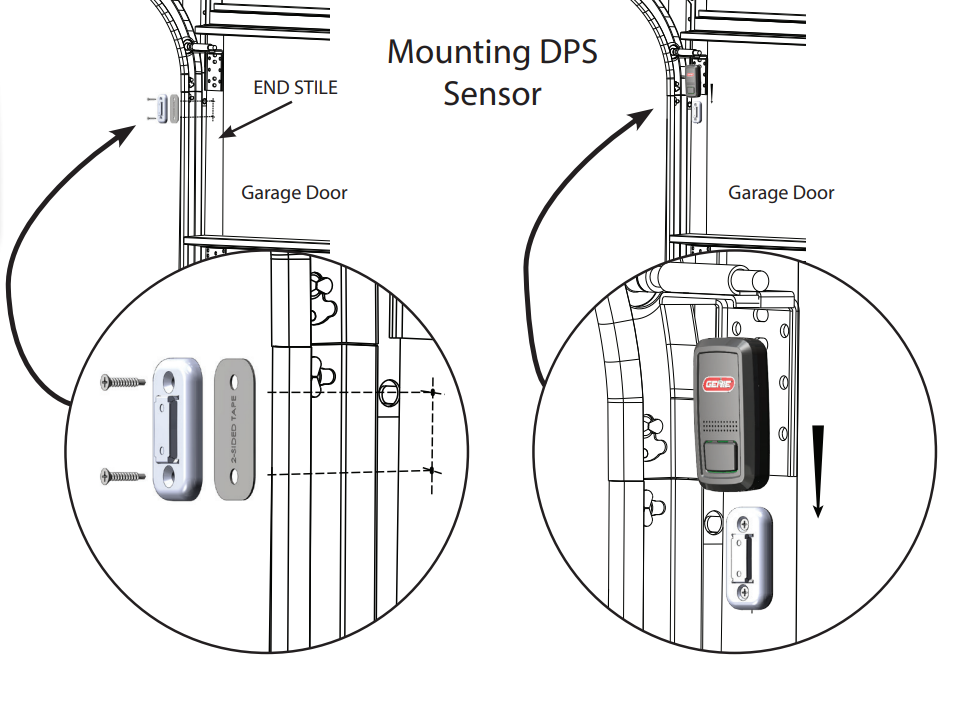
STEP 6 Mount DPS Module to Garage Door
DO NOT remove the battery “PULL TAB” from DPS until directed by the app. The DPS should be mounted on the TOP door panel only. Mount to steel reinforced end stile on the far left or right under the top hinge. DO NOT mount to the unreinforced door panel.
- Clean the door where DPS will mount.
- Install double-sided tape to the back of the mounting bracket and affix to the door.
- NOTE: Double-sided tape is designed to hold the bracket in place temporarily. It is not to be used for permanent mounting.
- Pre-drill 2 - 3/32 holes. DO NOT drill all the way through the door.
- Use the included self-tapping screws to mount the DPS bracket to the top door panel end stile.
- Slide the DPS down onto the mounting bracket. The DPS should snap onto the bracket.
- NOTE: The DPS included with this kit is already programmed to the DCM. See the note under STEP 7 regarding additional sensors.
STEP 7 Complete the Programming
- Restore power to the garage door opener.
- Operate the door with the wall control. Open the Aladdin Connect app and verify that the door position in the app is accurate.
- NOTE: This kit includes one DPS for use with one door only. The DPS included is already programmed to the DCM. Additional sensors can be purchased separately from your local Genie retailer. To program additional sensors, first complete STEP 7 initial setups and programming, then go to the “Add a Door Sensor” under the “Doors” tab inside the app
- NOTE: A white light will flash and an audible beep will sound as an indication that the door is about to move when commanded by the Aladdin Connect or other compatible app(s).
How To Set Up an Aladdin Connect Device with Amazon Alexa?
- Download the Amazon Alexa App if you haven't already. You will need your existing Amazon account information (or you will need to create one).
- Log in to the Amazon Alexa App and configure the Wi-Fi of your Alexa device as directed in the App.
- On the Alexa home screen, click on the three bars in the upper left corner. Choose either “Skills & Games” or “Things to Try” >> “Skills” >> “VIEW SKILLS.”
- Search in “Categories” under “Skills” or use the search button and look for “Aladdin Connect App.”
- You will be taken to a new screen with the Aladdin Connect logo. Click on the “ENABLE TO USE” button to link your Aladdin Connect account with your Alexa account.
- You will be navigated to another screen to enter your Aladdin Connect App login credentials to link both accounts.
- You will be able to remove the PIN later if you choose, however, by disabling your PIN, please be aware that you are deactivating a feature meant to provide an additional level of security. After you press “Login”, click “Done” in the upper left-hand corner. At this time, your Aladdin Connect account is linked to your Alexa account.
7. You will see instructions on the Skill screen on how to talk with Aladdin Connect. For example, you can say:
-
- "Alexa, ask Aladdin Connect to open my door."
- “Alexa, ask Aladdin Connect if my door is open.”
- Going forward, you can ask questions from Aladdin Connect.
Amazon Alexa Commands AVAILABLE VOICE COMMANDS
|
"Alexa - Ask Aladdin Connect to”
|
“Alexa – Ask Aladdin Connect if”
|
Frequently Asked Questions When Setting up an Aladdin Connect Device with Amazon Alexa
Q. I want to disable the PIN required to open my door using Alexa.
A. While the Aladdin Connect custom skill allowed users to disable the PIN, Amazon’s policy requires all products to have a PIN.
Q. After asking “Alexa, open/close my garage,” Alexa says, “Door not responding” but the door is moving.
A. Alexa will issue the command to your device and will wait for 60 sec before deciding that the door was not responsive. Depending on the network connective strength sometimes the device will not respond with an updated status in time. You can ask for the door's status by saying, “Alexa, is my garage door open/close?” or “Alexa, what is the status of my garage door?” You can also check the Aladdin Mobile app to check that your door is the desired state.
Q. I have unique garage door names but when I ask “Alexa, open/close my garage,” I get “Sorry, I cannot open/close multiple doors at once.”
A. This can happen when Alexa maps devices multiple times or has difficulty identifying devices due to faulty internal mappings. To fix this, delete all of the devices under the account. Add devices by going to Device> and then click on the “+” in the top right corner. In the next screen select "Add Device" and choose other from the bottom of the scrolling list. Once the device is added, the user should see their devices and should be able to operate them.
Q. I have tried deleting existing devices and added them back but I Alexa still says. “I don’t know any device with name 'your device name.'“
A. If the process of deleting and re-adding devices failed, you can try to re-link the skill. Delete all of the existing devices. Then go to “Skill and Games” and select “Your Skill.” Choose “Enabled” tab. Click “Aladdin Connect Smart Home” and disable the skill. Once you have disabled the skill select “Enable to Use” again.
Aladdin Connect Compatibility for Google Home/Assistant Instructions
- Download the Google Home App and the Google Assistant App.
- You will need your Gmail account (or need to create one).
- Log in to the Google Home and Google Assistant Apps.
- Configure the Wi-Fi of your Google Home device as directed in the Google Home App.
- Set up the Google Assistant on the Google Home App as directed.
- Go to the Profile tab >> More Settings >> Assistant >> Voice Match >>and set up the voice match feature.
- Go to the Profile tab >> More Settings >> Assistant >> Assistant Devices >> Name of Your Device >> Enable Personal Results.
- You should now be logged in to the Google Home App and Google Assistant with the same User ID.
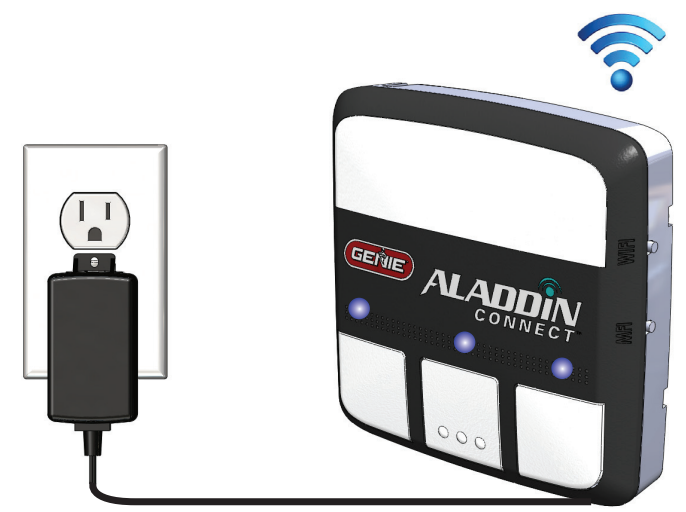
Understanding LED Lights & Troubleshooting
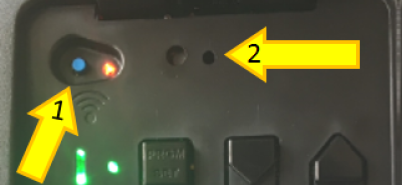
| Depending on the model, the set of Wi-Fi buttons and their LEDs (#1 and #2) can be found on the outside, under the light cover, or under the programming cover. |
|
| LED #1 | Definitions | Status |
| Solid RED | Not Configured/Not Paired. (out of box from factory) | Perform configuration by following the steps in the app. |
| Solid BLUE | Connecting to Wi-Fi. (occurs during configuration) | Normal process during configuration. |
| Solid GREEN | Internet connected through local router to cloud service (normal operation). | Paired. No action required. |
| Flashing GREEN | The Wi-Fi signal to the router is good, but the device is not communicating to the cloud – can’t get past the router or the device is unable to establish a secure communication link to the cloud. | Check the internet connection on the router. Perform a factory reset. See #1 below. |
|
“Timed Out” message on the app or the failure to progress from blue to green LED on the unit |
|
|
| Flashing BLUE | Operating in configuration access point (AP) mode and is ready for setup or is performing an OTA. | Wait up to 2 minutes to allow update to finish. LED stops flashing BLUE. |
Other Troubleshooting Options
- Factory Reset of the Wi-Fi Device: press and hold the blue button (#1 in photo) until you hear 2 beeps. The LEDs will start flashing and changing colors. Press and hold the grey button (#2) until it beeps twice. The LEDs will still be flashing and changing colors.
- NOTE: The serial # must be deleted on the owner's Aladdin Connect® app and re-installed. (The Tech Line can also delete the serial number).
- Customers using a Firewall with their router may wish to selectively open limited ports for our device. The DCM uses two IP ports, 123 and 443, for GDO Controller access to servers.
- Manual Over the Air (OTA) Update: not normally needed as the unit occasionally updates automatically but can be updated manually for the latest Wi-Fi firmware. The LED #1 must be green or flashing green. Press and hold the MFi grey button (#2 in the photo) until it beeps twice. An OTA may take 2 to 5 minutes to complete. When the LEDs stop flashing the firmware update is complete.
Get More with North Shore Commercial Door!
Once you're done syncing or troubleshooting your devices for Aladdin Connect, be sure to take your garage to greater heights by shopping North Shore's array of Genie garage accessories and replacement parts. Also, stay on top of any potential garage issues as components wear out by reading our Guide to Garage Door Maintenance!
Still Curious About Programming Remotes or Don't See Your Model?
Please reach out to us! Our in-house experts can help you with all of your remote and door-related questions. Get in touch with our support crew:
- Live chat: Click the green "Contact Us" button on the right
- Call: 800-783-6112
- Email: support@northshorecommercialdoor.com