Genie Universal Remote Compatibility & Installation Guide
Posted by Charlene Pepiot on 17th Nov 2023
Check the compatibility of top garage door opener brands with your Genie Universal remote and learn how to pair them with North Shore’s handy programming guide! We have multiple programming methods for different models listed to make setting up a breeze. North Shore has been in the industry for decades, so you can trust us with all of your remote needs.
Is the Genie Company a Good Brand?
Genie is a renowned garage door manufacturer and has been in the business for decades. The company takes pride in being an industry leader in innovative technology, from creating the first mass-produced, radio-controlled residential garage door opener in the 50s, to the smart home technology the company continues to improve upon today. If you’re interested in purchasing a Genie operator or are curious about how your current model ranks among others, you can check out our handy Genie Garage Door Openers Comparison Guide Chart!
What is a Universal Remote?
Universal remotes can control most major garage door opener brands in the industry, such as LiftMaster, Guardian, Sommer, and many others! They are rolling code and dip switch capable and depending on the model, Genie’s universal remotes can operate one or multiple doors! They’re also compact and conveniently designed for easy programming out of the box.
Programming Instructions for Genie Universal Remotes
Below are the brands and specifications the universal remote is compatible with and the available methods that can be used to program them. After reviewing Chart A for compatibility and method of installation, please proceed to STEP 1.
CHART A:
Brand Names | AVAILABLE PROGRAM METHOD | QUICK START METHOD | LEARN METHOD |
| Pre-set Button Number on Remote | Number of Button Presses | ||
| Genie® | 315/390 MHz, Intellicode® I, 1995-current | 1 | 1 |
| Overhead Door® | 315/390 MHz, CodeDodger® I, 1995-current | 1 | 1 |
| Chamberlain®
LiftMaster® CraftsMan® | Purple Learn Button, Security +®, 2006-2014, 315 MHz Orange/Red Learn Button, Security +®, 1996-2005, 390 MHz Yellow Learn Button, Security +2.0®, 2011-current, 390 MHz Green Learn Button, Billion Code®, 1993-1995, 390 MHz | 2 3 4 | 2 3 4 5 |
| Genie® | 315/390 MHz, Intellicode® II, 2010-2011 | 6 | |
| Overhead Door® | 315/390 MHz, CodeDodger® II, 2010-2011 | 6 | |
| Sommer® | 310 MHz, Rolling Code | 7 | |
| Linear® | 318 MHz, Mega Code® | 8 | |
| Wayne Dalton® | 372.5 MHz, Rolling Code, 1999-current | 9 | |
| Ryobi® | 372.5 MHz, Rolling Code | 10 | |
| Guardian® | 303 MHz, Fixed Learn Code | 11 | |
| Xtreme® brand | 303 MHz, Fixed Learn Code | 11 | |
| Marantec® | 315 MHz, Fixed Learn Code | 12 | |
| *Chamberlain® | 390 MHz, 9 Switch/3 Position Dip Switch | Go to "Conversion Instructions for Genie Fixed Code" | |
| *Stanley® | 310 MHz, 10 Switch/2 Position Dip Switch | Go to "Conversion Instructions for Genie Fixed Code" | |
| *Genie® | 390 MHz, 9 & 12 Switch/2 Position Dip Switch, 1993-1995 | Go to "Conversion Instructions for Genie Fixed Code" | |
| *Overhead Door® | 390 MHz, 9 Switch/3 Position Dip Switch, 1993-1995 | Go to "Conversion Instructions for Genie Fixed Code" |
STEP 1 - FIND SPECIFICATIONS & LEARN BUTTON
- Find the brand and opener/receiver specifications for your device by either checking its label, the instruction manual, the current remote controls for the opener, or the original manufacturer of the opener/receiver.
- Find the LEARN/PROG button on your device. The shape, color, or name of this button could vary by brand.
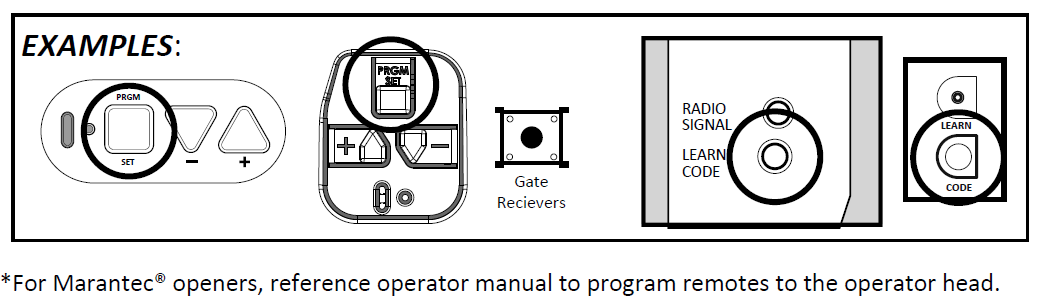
STEP 2 - BUTTON LAYOUT & LED
The LED will light each time buttons are pressed along with pressing buttons during different programming modes.
STEP 3 - CHOOSE A PROGRAMMING OPTION
Review “Chart A” above to find your specifications and available programming options. You may use any combination of options available for your opener/specification to achieve your desired button set-up. Each button can be programmed separately to operate up to 4 different garage door openers and gate receivers.
OPTION 1: QUICK START METHOD
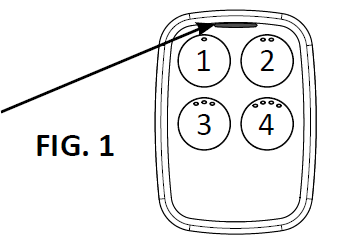 | Reference FIG 1 to use any of the following four manufacturer pre-sets to quickly program a button: |
Button 1: Genie Intellicode 1 or Overhead Door CodeDodger I
Button 2: Chamberlain® with a PURPLE LEARN Button
Button 3: Chamberlain® with an ORANGE/RED LEARN Button
Button 4: Chamberlain® with a YELLOW LEARN Button - Move directly to the next segment "Quick Start Method - Yellow Learn Button" for instructions.
If using Button 1, 2 or 3:
- On your garage door opener, press the LEARN button for 2-3 seconds and then release it.
- On your universal remote, press and release the pre-set button that corresponds with the opener once every 2 seconds until the garage door opener operates. The programming is now complete.
TIP: Allow the LED light on the universal transmitter to stop flashing before you press the next button.
QUICK START METHOD - YELLOW LEARN BUTTON
If you are using Button 4 for a YELLOW LEARN Button from Chamberlain, LiftMaster, or Craftsman:
- Press and hold down the button 4 for 5 seconds. Release the button after the white LED blinks 3 times and goes out.
- On the opener, press the LEARN/PROGRAM button for 2-3 seconds and then release it.
- On the remote, press the button you chose ONE time. The opener will click.
- On the opener, press the LEARN/PROGRAM button again for 2-3 seconds and then release it.
- On the remote, press the button you chose again ONE time. The opener will click again. The next button press should operate the opener.
TIP: Allow the LED light on the universal transmitter to stop flashing before you press the next button.
OPTION 2: LEARN METHOD
With this method, your universal remote will learn which specification you want it to work with.
- Find and remember the required number of button presses in the LEARN METHOD column next to your brands/specifications located in Chart A.
- On your universal remote, press and hold down button 2. (Reference FIG. 1).
- While you are still holding down button 2, press button 4 on the universal remote four times.
- Release both buttons. The BLUE LED on the remote will begin flashing.
- On the universal remote, press the button of your choice the required number of times again. You will have 15 seconds to complete this task.
- Wait the remainder of the 15 seconds. The BLUE LED will give a long blink and go out.
**If using Chamberlain with the Yellow LEARN button, please move directly to the Chamberlain YELLOW LEARN button instructions shown below. If using ANY OTHER brand/specification, please continue to step 7.
YELLOW BUTTON LEARN METHOD INSTALLATION FOR CHAMBERLAIN, LIFTMASTER & CRAFTSMAN (RECOMMENDED)
- On the remote, press and hold down button 2. (Reference FIG. 1)
- While still holding down button 2, press button 4 on the remote four times.
- Release both buttons. The BLUE LED will begin flashing.
- On the remote, press the button of your choice four times and wait the remainder of the 15 seconds. The BLUE LED will give a long blink and go out.
- Press and hold down the same button you chose for 5 seconds. Release the button after the WHITE LED blinks 3 times and goes out.
- On the opener, press the LEARN/PROGRAM button for 2-3 seconds and then release.
- On the remote, press the button you chose ONE time. The opener will click.
- On the opener, press the LEARN/PROGRAM button again for 2-3 seconds then release.
- Press the button you chose ONE time again. The opener will click again.
- Test the button. The programming is complete.
TIP: Allow the LED light on the universal transmitter to stop flashing before your next button press.
OPTION 2: LEARN METHOD CONTINUED
7. On the garage door opener, press the LEARN button for 2-3 seconds and then release.
8. On the universal remote, press and release the button you just programmed once every 2 seconds until the garage door opener begins to operate. The programming is complete.
TIP: Allow the LED light on the universal transmitter to stop flashing before your next button press.
Clearing the Universal Remote:
On the universal remote, press and hold down button 3 while pressing button 4 four times. The blue LED will give a long blink and then go out.
If the above does not work, clear the remote in the same manner that you would clear the original transmitters from the head. Please consult your opener manual for instructions. In most situations, clearing the opener head will clear all devices that are currently programmed.
Go Further with Genie!
Once your Genie Universal Remote is set up, be sure to take your garage to greater heights by shopping Genie’s array of garage accessories. Also, stay on top of any potential garage issues as components wear out by reading our Guide to Garage Door Maintenance!
Still Curious About Universal Remote Controls?
Please ask! Our in-house experts can help you with your questions for Genie and other top brands on the market. Get in touch with our support crew:
- Live chat: Click the green "Contact Us" button on the right
- Call: 800-783-6112
- Email: support@northshorecommercialdoor.com