Genie Universal Wireless Wall Console Compatibility & Programming Guide
Posted by Charlene Pepiot on 30th Nov 2023
Learn how to program your Genie Universal wireless wall console model GUWWC with North Shore’s handy guide! We have multiple programming methods for different opener brands to make setting up a breeze. Whether you need to program with dip switches, fixed codes, teach & pair, or more, you’ll find the instructions here. North Shore has been in the industry for decades, so trust us to take your wall console to new heights!
Is the Genie Company a Good Brand?
Genie is a well-known garage door manufacturer that has been in the business for decades. The company is an industry leader in innovative technology, from creating the first mass-produced, radio-controlled residential garage door opener in the 50s, to the smart home technology the company continues to improve upon today and everything in between. If you’re interested in purchasing a Genie operator or are curious about how your current model ranks among others, you can check out our handy Genie Garage Door Openers Comparison Guide Chart!
What Should I Know Before Programming the Genie GUWWC Universal Wireless Wall Console?
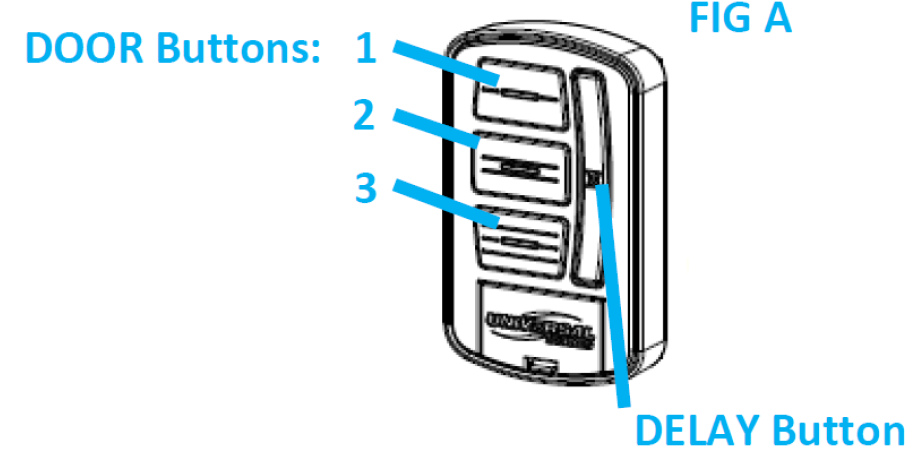
| Fig. A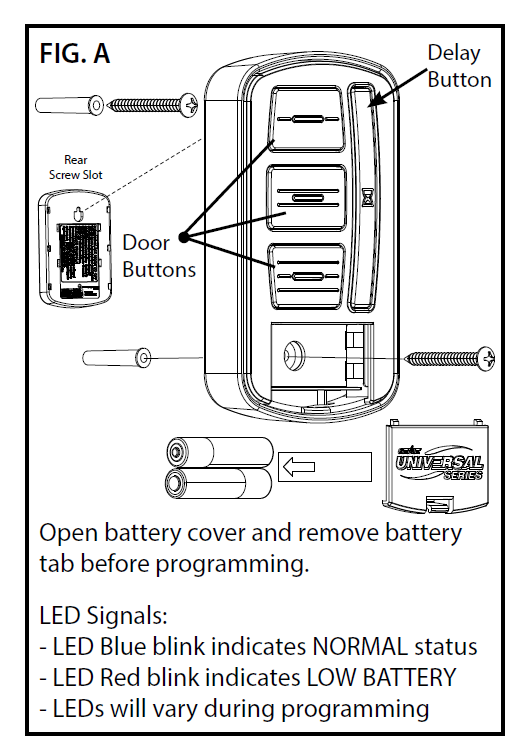 |
CHART A:
LEARN METHOD ID# | AVAILABLE PROGRAM METHOD | |
Brand Name | Specification Notes | Number of Button Presses (ID#) |
Genie® | 315/390 MHz, lntellicode0 I, 1995-current | 1 |
Overhead Door® | 315/390 MHz, CodeDodger" I, 1995-current | 1 |
Chamberlain® LiftMaster® CraftsMan® | 315/390 MHz, CodeDodger" I, 1995-current Orange/Red Learn Button, Security+, 1996-2005, 390 MHz Yellow Learn Button, Security +2.0, 2011-current, 390 MHz Green Learn Button, Billion Code", 1993-1995, 390 MHz | 2 3 4 5 |
Genie® | 315/390 MHz, lntellicode 11, 2010-2011 | 6 |
Overhead Door® | 315/390 MHz, CodeDodger" 11, 2010-2011 | 6 |
| Sommer® | 310 MHz, Rolling Code | 7 |
| Linear® | 318 MHz, Mega Code | 8 |
Wayne Dalton® | 372.5 MHz, Rolling Code, 1999-current | 9 |
| Ryobi® | 372.5 MHz, Rolling Code | 10 |
| Guardian® | 303 MHz, Fixed Learn Code | 11 |
Xtreme brand | 303 MHz, Fixed Learn Code | 11 |
| Marantec® | 315 MHz, Fixed Learn Code | 12 |
| FAAC® | 433.92 MHz, Rolling Code | 13 |
| *Chamberlain® | 390 MHz, 9 Switch/3 Position Dip Switch | See Chart B |
| *Stanley® | 310 MHz, 10 Switch/2 position Dip Switch | See Chart B |
| *Genie® | 390 MHz, 9 & 12 Switch/2 Position Dip Switch, 1993-1995 | See Chart B |
| *Overhead Door® | 390 MHz, 9 Switch/3 Position Dip Switch, 1993-1995 | See Chart B |
Universal Wireless Wall Console Instructions
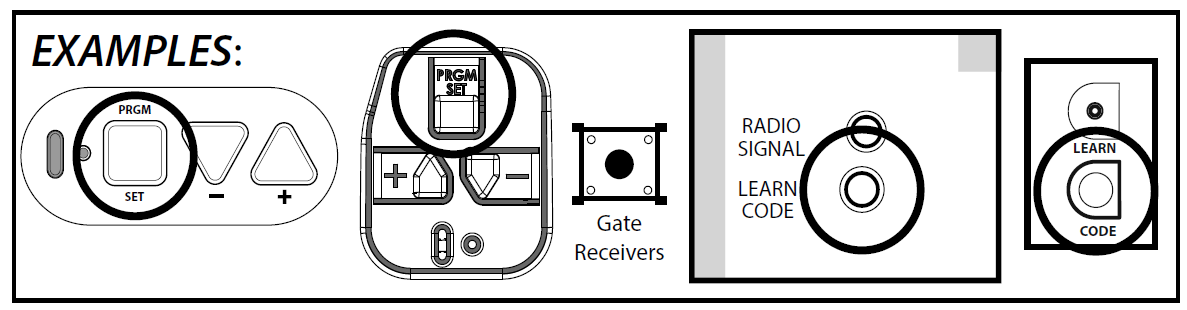
STEP 1 - FIND SPECIFICATIONS & LEARN BUTTON
- Locate the brand and opener/receiver specifications for your device by consulting the label on the opener/receiver, the instruction manual, the current remote controls for the opener, or the original manufacturer of the opener/receiver.
- Find the LEARN/PROG button on your device. The shape, color, and name of this button could vary by brand. For garage door openers, be sure to check under the light covers. For commercial or gate openers, the LEARN/PROG button may be on the circuit board of the opener. In some cases, the button could also be on an external receiver that is mounted on or near the product. Consult the device’s manual if needed.
STEP 2 - PROGRAMMING the UNIVERSAL WIRELESS WALL CONSOLE
Please note, for ID#4 Chamberlain®/LiftMaster®/Craftsman® Yellow Learn Button products, move immediately to the proper section below. For all other ID#s, proceed to the LEARN METHOD section.
LEARN METHOD (RECOMMENDED PROGRAMMING)
Review Chart A to find your specifications and available programming options. Each button can be programmed individually to operate up to 3 different brands of garage door openers and gate receivers.
- Remove the activation tab from inside the battery compartment.
- Find and remember the required number of button presses (ID#) in the LEARN METHOD column next to your brands/specifications in Chart A.
- REMEMBER: For ID#4 Chamberlain®/LiftMaster®/Craftsman® Yellow Learn Button ONLY, move immediately to the instructions below. For all other ID#s, proceed to step 4.
- Press and hold down the DELAY button until ALL 3 BLUE LEDs start blinking and then release after 5 seconds.
- Press the DOOR button of your choice the required number of times from Step 1 (Chart A).
- TIP: You may program all 3 DOOR buttons at one time if preferred. The DELAY button press will signal completion for all buttons.
- Press the DELAY button one time to signal that the entry is complete.
- On the opener, press the LEARN/PROGRAM button for 2-3 seconds and then release it.
- Press the DOOR button you just programmed once every two seconds until the opener begins to operate.
- When the door stops moving, press the DOOR button again to test that everything is working properly. The programming is complete.
Programming Instructions for ID#4 Chamberlain®/LiftMaster®/Craftsman® Yellow Learn Products Only:
- Remove the activation tab from the inside of the battery compartment.
- Press and hold down the DELAY button until ALL 3 BLUE LEDs start blinking. Release after 5 seconds.
- Press the DOOR button of your choice four times.
- TIP: You may program all 3 DOOR buttons at one time if you prefer. The DELAY button press will signal the completion of all buttons.
- Press the DELAY button one time to signal the entry is complete.
- Press and hold down the DOOR button you just chose until the red LED in the top button blinks and goes out after 5 seconds.
- On the opener, press the LEARN/PROGRAM button for 2-3 seconds and then release.
- Press the door button you chose ONE time. The opener will click.
- On the opener, press the LEARN/PROGRAM button again for 2-3 seconds and then release.
- Press the door button you chose ONE time again. The opener will click again.
- Press the DOOR button again and the opener will activate.
- When the door stops moving, press the DOOR button again to test. The programming is complete.
STEP 3 - OPERATING THE WALL CONSOLE
Operating a Door:
- Press and release the door button of your choice. The door will move up or down.
To initiate the DELAY feature on any DOOR button:
- Press and release the DELAY button one time, two times, or three times for delayed door movement.
- Press and release the DOOR button of your choice. Activation will be delayed by 10, 15, or 20 seconds.
ALTERNATE INSTRUCTIONS for the UNIVERSAL WIRELESS WALL CONSOLE
Below are alternate instructions for your wall console, including the Teach & Pair Programming Method, Fixed Code/Dip Switch Programming and alternate blink rates. These are to be used in conjunction with the main instruction set.
CHANGING BLINK RATE PATTERNS
BLUE LED Blink Rate Mode 1: Factory Default Setting
(Blink Rate ‐ Once every 3 sec)
- With only (1) AAA battery installed, hold down the TOP DOOR button while simultaneously installing the second AAA battery. Continue to hold the TOP DOOR button for a total of 10 seconds until the blue LEDs on the OTHER 2 BUTTONS blink 3 times in unison.
BLUE LED Blink Rate Mode 2
(Faster Blink Rate ‐ Once every 2 seconds)
- With only (1) AAA battery installed, hold down the MIDDLE DOOR button while simultaneously installing the second AAA battery. Continue to hold the MIDDLE DOOR button for a total of 10 seconds until the blue LEDs on the OTHER 2 BUTTONS blink 3 times in unison.
BLUE LED Blink OFF Mode 3
(Blue LED OFF ‐ Maximum Battery Life)
- With only (1) AAA battery installed, hold down the BOTTOM DOOR button while simultaneously installing the second AAA battery. Continue to hold the BOTTOM DOOR button for a total of 10 seconds until the blue LEDs on the OTHER 2 BUTTONS blink 3 times in unison.
Changes made to the blue LED blink rate pattern will impact the battery life. For the best battery life, see Blink Rate Mode 3 to turn LEDs off completely.
DIP SWITCH / FIXED CODE PROGRAMMING
If the opener has a group of switches with 3 positions per switch (TRINARY):
In the example to the right, the code would be: | 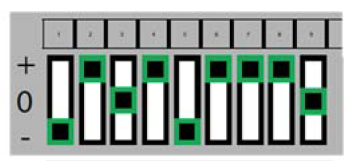 |
If the opener has a group of switches with 2 positions per switch (BINARY):
In the example to the right, the code would be: | 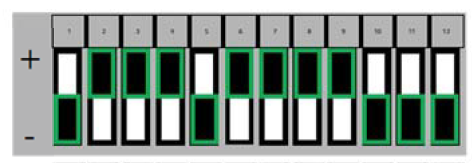 |


Step 1: Record Switch Positions
- Each shaded box below represents a switch position. Create a similar diagram and write in the number 1, 2 or 3 as it corresponds to the +, 0, or – switch position shown on the remote, opener or receiver. If you have less than 12 switches, only fill in what you have. You will reference this section in STEP 3.5 below.

Step 2: Determine Specifications
- Find your specification in CHART B below and record the number, which should be 1, 2, 3, 4 or 5. You will reference this in STEP 3.3.
CHART B:
| Brand Name | NUMBER OF SWITCHES/ POSSIBLE POSITIONS | NUMBER OF TIMES TO PRESS THE BUTTON OF YOUR CHOICE |
| Genie® | 12 switches with 2 possible positions (UP, DOWN) | 1 |
| Genie® | 9 switches with 2 possible positions (UP, DOWN) | 2 |
| Overhead Door® | 9 switches with 3 possible positions (UP, MIDDLE, DOWN) | 3 |
| Stanley® | 310 Mhz, 10 switch/2 position dip switch | 4 |
| Chamberlain® | 390 MHz, 9 Switch / 3 Position Dip Switch* | 5 |
Step 3: Programming
- Remove the activation tab from inside the battery compartment.
- Press and hold down the DELAY button for 10 seconds until only a green LED lights on the top button, then release. The green LED will continue flashing.
- Press your DOOR button of choice the required number of times that corresponds with your opener from Chart B above (recorded answer from STEP 2).
- Press the DELAY button one time to signal the entry is complete. The green LED will blink rapidly indicating it is ready to receive the recorded switch positions from STEP 1.
- Enter the switch positions that you determined in STEP 1 above. These are a series of DOOR button presses that are 1, 2, or 3.
- After entering the final switch position, press and release the DELAY button ONE time. The entry is now complete.
- Test the button. The next DOOR button press should activate the opener.
TEACH & PAIR PROGRAMMING METHOD
Review Chart A to find your specifications and available programming options.
IMPORTANT: For ID#4 Chamberlain®/LiftMaster®/Craftsman® Yellow Learn Button products, move immediately to the instructions on the right side. For all other ID#s, proceed with the instructions on the left.
| TEACH & PAIR PROGRAMMING METHOD for ID#4 Chamberlain®/LiftMaster®/Craftsman®Yellow Learn Button ONLY | TEACH & PAIR PROGRAMMING METHOD for all openers EXCEPT ID#4 Yellow Learn Button |
| 1. Remove the activation tab from inside the battery compartment. 2. Press and hold down the DELAY button until only a red LED lights on the top button. Release after 15 seconds. 3. Place the existing operational remote 1.5‐ 3 inches away from the front of the universal wireless wall console. 4. Press and hold down a button from the original remote. Do not release until the new universal wireless wall console changes from SLOW red blinks to RAPID red blinks. You will have 20 seconds to complete this step. TIP: If the console does not recognize the transmission, try pressing the original remote button for periods of 10 seconds at a time while trying different distances between 1.5‐3 inches away from the front of the console. 5. When the wall console changes to RAPID red blinks, press the DOOR button of choice on the console ONE TIME. The red LED will turn solid and then go out. 6. Now, press and hold down the DOOR button you just programmed until the red LED in the top button blinks and goes out after 5 seconds. 7. On the opener, press the LEARN/PROGRAM button for 2‐3 seconds, then release. 8. On the console, press the DOOR button you chose ONE time. The opener will click. 9. On the opener, press the LEARN/PROGRAM button again for 2‐3 seconds and then release. 10. On the console, press the DOOR button you chose again ONE time. The opener will click again. 11. Press the DOOR button again and the opener will activate. 12. When the door stops moving, press the DOOR button again to test. Programming is complete. | 1. Remove the activation tab from inside the battery compartment. 2. Press and hold down the DELAY button until only a red LED lights on the top button and then release (@15 sec). 3. Place the existing operational remote 1.5‐ 3 inches away from the front of the universal wireless wall console. 4. Press and hold down a button from the original remote. Do not release until the new universal wireless wall console changes from SLOW red blinks to RAPID red blinks. You will have 20 seconds to complete. TIP: If the console does not recognize the transmission, try pressing the original remote button for periods of 10 seconds at a time while trying different distances between 1.5‐3 inches away from the front of the console. 5. When the wall console changes to RAPID red blinks, press the DOOR button of choice on the console ONE TIME. The red LED will turn solid and then go out. 6. On the opener, press the LEARN/PROGRAM button for 2‐3 seconds and then release. 7. Press the DOOR button you just programmed once every two seconds until the opener operates. 8. When the door stops moving, press the DOOR button again to test. Programming is complete. |
Go Further with Genie!
Once your Genie Universal Wall Console is set up, be sure to take your garage to greater heights by shopping Genie’s array of garage accessories. Also, stay on top of any potential garage issues by reading our Guide to Garage Door Maintenance!
Still Curious About Universal Wall Consoles?
Please ask! Our in-house experts can help you with your questions for Genie and other top brands on the market. Get in touch with our support crew:
- Live chat: Click the green "Contact Us" button on the right
- Call: 800-783-6112
- Email: support@northshorecommercialdoor.com